How to Organize Your Speech Therapy Worksheets and Activities
Welcome back! This is week 2 of our SLP Summer Organization Series! If you missed week 1, click here! We put together your “Speech-in-a-Box” kit that stores your primary therapy materials. Each week this summer, I’ll be helping you organize one aspect of your therapy space or practice.
So without further ado, let’s get on to this week’s mission!
Mission 2: Organize Your Worksheets & Therapy Activities
Last week, I made you pull out only the materials that you use on a regular basis and we added those to your “Speech-in-a-Box”. This week, we’re going to talk about what to do with all the rest of it! For today, we’re just going to talk about your actual therapy materials, worksheets and other smaller activities, not your toys, games, books, etc. Don’t worry, we’ll talk about those next week! 😉
Feel free to watch the video below, or skip ahead to read the directions and find the link!
Step One: Gather your Materials
Ok, let’s see what you have to work with! Pull out all of the therapy materials and activities that you’ve been storing in your space. Set aside the bigger stuff, like large articulation card sets, games, books, and toys. For today, we just want to go through your stashes of worksheets, Teachers Pay Teachers style materials, and small card/activity sets. You can just pile it up for now, we’ll go through it all in the next step.
Step Two: Pull Out the Ones You Love
Does it bring you joy? Do you love it? If so, pull it out of the pile. For this step, you’ll be pulling out the materials that you know you’ll definitely use and that work well for your particular brand of clients.
Try to be a little choosy here; space is limited after all! Try to avoid having more than one material that works on the same thing. Choose the most valuable one and put the other one back in the pile. Also, choose smaller, worksheet-sized materials over larger activities. If you need help finding more worksheet-sized activities and resources, join our membership! It’s all you can print for only $25 per month!
Once you’ve chosen the materials that are your favorites, group them into category by what they address: speech, language, literacy, social skills, etc.
Step Three: Put Away the Rest
If you’re at all like me, you’ve probably hoarded and accumulated more therapy activities than you really need. Right now, I want you to take all of the activities and materials that you DIDN’T choose as your favorites and put them all in a box. Then, put that box somewhere out of sight.
Keep the box around for a while, because you may come upon a session where you need something from that box. If so, you’ll dig that one activity out and add it to your activity binders (we’re making those next).
Set a date where you’ll go back and recycle or donate the stuff that’s still in that box. Maybe it’s a few months. Or, maybe it’s 6 months if you have more seasonal items. Set a reminder on your calendar to dump whatever is left in the box after that date. If you haven’t used them by then, you’ll do just fine without them!
Step Four: Set Up Your Activity Binders
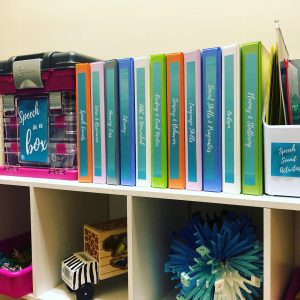
Now for the fun part! Take a look at how many groups that you piled your resources into. Remember, you were grouping them by area, like speech, language, literacy, etc. For each of those piles, you need something to organize the materials. I highly recommend 3-ring binders for their versatility but you can also use magazine holders or other larger containers. As long as you can get most of your materials from that pile into the binder or box, you’re good to go! We’ll organize some of that bigger stuff next week. Here are a couple of examples of how to do this:

Our free downloadable activity binder labels include the following 12 areas. Feel free to only use the ones that you’re currently treating in your practice:
- Speech Sounds
- Language Skills
- Literacy
- Fluency/Stuttering
- Voice/Resonance
- Cognition/Memory
- Autism
- Sensory/Behavior
- Pragmatics/Social Skills
- Hearing Loss
- AAC/Nonverbal
- Feeding/Oral Motor
Here are some links to some of my favorite resources, in case you need a good place to start. These are affiliate links through amazon so if you do choose to purchase through my links, I’ll get a small kick-back at no additional cost to you. Thank you in advance if you choose to do that!


Step Five: Add Materials to Your Notebooks
Start with the activities that you’ve already selected as the ones you LOVE! Add them to the corresponding notebook or box. Whenever possible, put them in plastic sheet protectors so you can use dry erase markers and re-use them.
That’s all you need to do for now! As you do more and more therapy with your clients, you’ll find more resources that you’ll want to add. Add them as you go along until you have a nice full notebook of go-to resources. And don’t forget to go through from time to time to take out the old stuff that you’re not using anymore.
Need More Activities for Your Binders?
We have you covered! The SLP Solution membership had hundreds of pre-made, worksheet-sized therapy activities that are ready for you right now! If you’re lacking materials for any of the 12 areas, join today and print off as much as you want for only $25 per month! Plus, you’ll get access to our therapy plans, webinars, and paperwork resources as well!
What’s Next??
In our next post, I help you figure out how to organize those larger items:
Click Here to Organize Your Larger Materials
Plus there’s more to come! Sign up for our email list so you don’t miss anything: